Creation of plate 24
About proportions (See Portfolio plate 24)
Use
your browser 'Back' button to return
Two
Projectors
A far more sophisticated technique for combining images is
preferred, because so many more exciting possibilities exist. This method
involves using two projectors, but one has then an exciting way of blending any two
previously created pictures, with far more control!
The technique is simple, just project both images separately on to the same
choice of screen. However, these images can now be positioned which ever way
one might wish, one image could be much larger than the other, also by masking parts of each image, a
different blend of the two pictures can be created. This is how any parts, of
any picture, can be blended together and all the time one can see exactly what is to be
photographed.
Ideally, two identical projectors should be used, if possible with zoom lenses.
Should this prove impractical then variations in performance of the second
projector can be allowed for, by masking the brighter of the two, just in front of the
lens to achieve the same brilliance from both projectors.
To enhance the quality of the results one can achieve with this technique, there is an
advantage in obtaining a screen designed for rear projection.
Image Blending
Once the full potential of using two projectors is
realised,
there will be a need for quite different types of images, these are what are referred to
as background shots, in the advertising world. A completely new stock of
photographs will have to be taken, with blending potential in mind, no matter how many
pictures are available from the past.
The main disadvantage of the sandwich technique is that there is no allowance for
selective shading, masking, or changing colours of part of one, or the other image.
One has to accept the full influence of the one image on the other as they
exist.
Instead of sandwiching the two pieces of film, project them separately at the same screen
to overlap each other.
Now each image can be simply modified: The brightness of one image, as against the other,
can be controlled. By masking and shading just parts, of each image,
these can then be
blended. Colours of certain areas can be adjusted with filters. The
position of each image, relative to each other, can be altered. Or even the
size, of one image as against the other, can easily be changed. One of the
images could be distorted, reflected, or be changed in to a pattern by the use of a
crystal. The possibilities are quite staggering!
Best of all, the combined images are there to be seen all the time, until the desired
result is formed. There is no need to rely on guesswork, as so many other
special effects seem to demand, with these methods no film really should ever be wasted.
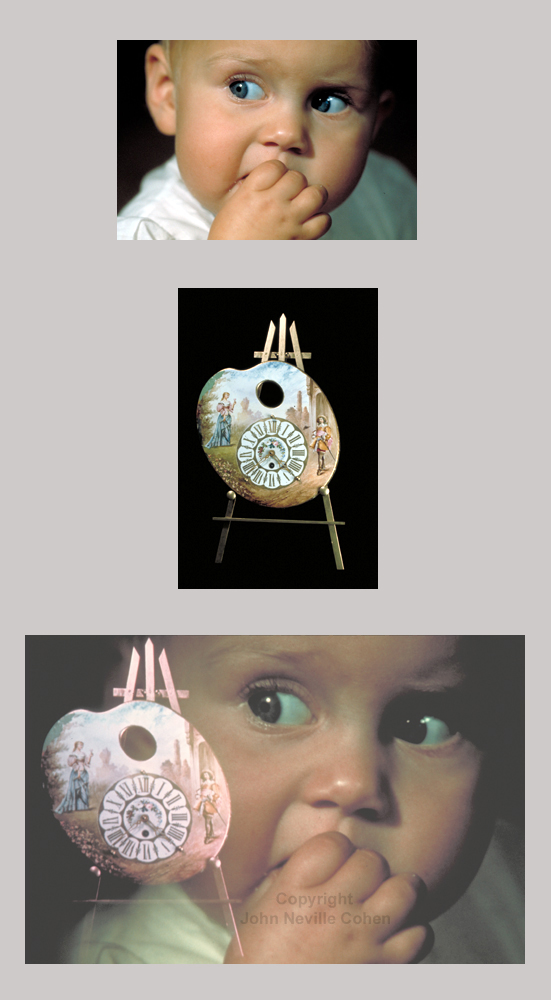
To demonstrate the different options let us start with plate 24 Children's hour
(above). The portrait was projected, whilst a photograph of an old clock (taken against a
black background) in the second projector, was aimed to overlap the portrait. The advantage of scale has been used here, as really the clock face was larger than the
baby. This was easily done with a zoom lens otherwise it could also have been
achieved by altering the distance between the screen and the projector.
Sometimes there can be a problem of one image appearing far brighter than the other. This can happen if one photograph is denser than the other, or if one
projector is that much closer to the screen. This is a problem that can be
tackled two ways. The first method is to mask close to the front of the
projector lens, projecting the brighter image, to darken it. The other way is
to double expose with the camera. Simply block the light from one projector,
expose the first image, then block the other projector and take the second exposure,
corrected for the brightness.
Plate 23 (below) is only mentioned to demonstrate how solid objects, such as the Churchill
memorial crowns, can be made to appear transparent. Projecting two
transparencies, each a portrait of Susan created the plastic surgery effect plate 25
(below). These were carefully aligned so that the two nearest eyes exactly
overlapped each other. It was then just a case of carefully masking away the
parts of each portrait projected that was no longer required.
With two projectors it becomes possible to mix film effects together in a way not possible
before. It is so easy to blend negative images with transparencies, in colour,
or black and white. Instead of transparencies in both projectors, one of them
could be projecting a black and white negative, or a colour negative just as easily.
|
![[Catalog]](../images/b_catl.gif)


