|
Camera -
Any single lens reflex camera and a good tripod.
NOTE: 'Spirit of Spring' was created with a Retina Reflex III camera.
Projector - Old, inexpensive, single slide projectors are
favoured, where there is access to the space between the lens and the slide, just one will
do. A zoom lens would be an advantage.
If possible a maximum of three similar projectors will enable
every technique described to be achieved. However, much can be done with just
one, and so much more with two, three will only occasionally be required.
Crystals
- Any old chandelier crystals, of about 2.5cm diameter
often found in junk shops.
Mirrors - A couple of very small unframed oblong mirrors
without the beveled edge are best.
Masking - Some stiff black card and some tracing paper for
masking. Only small sheets are used, (10 x 20cm) will be larger than needed.
Masking is also achieved behind the lens by making use of Blu-tack on thin
glass, such as the glass used for mounting slides.
Screen - A rear projection screen is not essential but could
be an advantage for image blending.
Transparencies
Surprisingly, it is colour reversal films, creating transparencies, that the author
favours (Kodachrome 25ASA was prefered). Even though there may appear to be no way of altering the end result
of an exposure once it has been made. Providing that the subject has been
chosen well and correctly exposed, then a transparency may well have been produced that
has a certain magic, when projected, with which no print can ever compete.
All the studies in this portfolio have been scanned from the original transparencies.
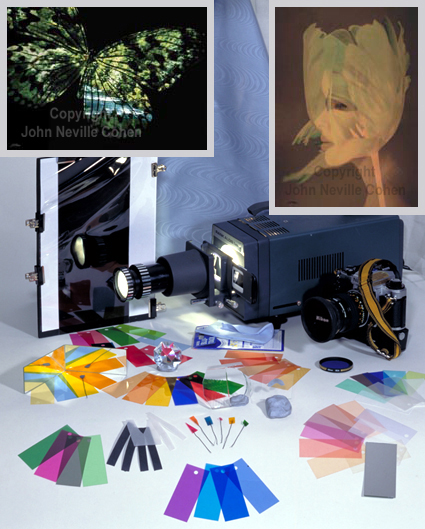
A glance at the transparencies will reveal startling effects that seem
impossible to photograph. Most people would presume, quite wrongly, that they
must be the result of digital manipulation. Studies such as; the profile of a
girl blends in with a negative of a tulip 'Spirit of Spring' (plate
3), or a river in the wings of a butterfly (plate 5), are
typical examples. There are very many more but some of these pictures were
created by the author long before expensive computers and digital photo manipulation
software. Have a look at the Portfolio
(please use your browser 'Back' button to return).
What advanced specialised knowledge is required to create such
transparencies? What technical complicated equipment is necessary?
What kind of devious chemical darkroom treatment has been involved?
The answer to all these questions is none whatsoever!
Nothing
more than the ability to expose film correctly with some imagination is really required.
No need to know about film processing as these methods do not involve any
work in the darkroom.
All the studies have been taken from transparencies that have been normally processed
commercially without any special treatment. As far as equipment is concerned
the author has often used a reflex 35mm camera with the usual lenses, and some odds and
ends, that most amateur photographers will have available already.
There is absolute control with this method. It is simple to understand and
everything can even be seen before the film is exposed. These images are not complex in
production with the solitary proviso that the photographer must be capable of exposing
film correctly under artificial light conditions. It is the projector that
provides all the magic, really living up to its early name of the magic lantern.
Filters
- Only very small filters are needed, not much larger than
the projected film, as they are used behind the slide. They do not have to be
optically perfect, even sweet wrappers will do, or if one can obtain a sample swatch of
transparent colours - all the better!
A blue filter to convert daylight film to artificial light
for the camera could be useful.
Reflections - A sheet of acetate, as used for overhead
projectors is ideal.
|


![[Logo Image]](../images/magilogo.jpg)